
 Correction & Projection:
  Spatial Analysis:
  Spectral Analysis:
  Timing Analysis:
 EXSAS installation:
 EXSAS for Linux:
Why the flag time, used to keep into account the different exposures in the source+background and background spectra, is not set ON by default in the PREPARE/SPEC command? Shouldn't I add this to take into account the different exposures in the source and background exposures?
The trouble is coming from the the ROSAT PSPC survey data. In theory, the small portion of scanned sky you are interested in can be considered as exposed uniformly - therefore it would be unnecessary to set the time flag on (in practice the exposure may change from point to point for different reasons, such as missing scans or detector switching on and off, or because you are very close to one of the ecliptic poles, but the main problem is not this one). Now, even under the assumption of "uniform exposure" important things must be considered.In the case of survey data, the accepted times written to the descriptor header of the PET (descriptor TIM_SEL) are just the on-times of the detector. The actual exposure time on your source (or on any other point of the sky) cannot be derived by this kind of information (it should be derived instead from the attitude data, or from the distribution of the photons).
For this reason, people started to develop different (personal) methods meant to compute the actual exposure time for a given source. Here is the simplest method (and the most silly): select the photons from a circular sky area around the source, find the time of the first photon, find the time of the last photon, and the difference is taken as the exposure time for the source.
You can see immediately that this method fails miserably in the case of low count rates, but suppose for a moment that the source count rate were high and the computed exposure were therefore correct with a good approximation.
How about the background? If one specifies the time=time flag, the program will keep into account the exposure of the background. Typically, people forget to compute the background exposure times - and the program PREPARE/SPECTRUM finds that the exposure of the background is huge (all the time while the detector was on!). If the flag "time" is on, the program will normalize the background for the huge exposure, reducing its count rate essentially to zero. Result: no error message displayed, and no significant background subtraction performed. But maybe the user is clever, and he has computed the exposure time for the background too - taking the first and the last photon arrival times and making the difference. But where the background was taken from? Typically one takes the background from an annulus around the source. And here comes the trouble: this background shape, even if often an optimal choice in analyzing pointed observations, is quite bad for survey data: in fact, it extends East-West including parts of the sky that were scanned before and after the source entered and left the detector. If we use the first-last photon method to compute the background exposure time, we will largely overestimate it (note: the exposure "density" is exactly the same for the background and the source area, because each point of the area stays in the detector about the same time - what enters first leaves first). Again, the effect will be to underestimate the background counts during their subtraction (provided that the "time" flag was set "on").
This kind of mistake during the analysis of survey data was initially so common among the general user (we had such interesting spectral fitting results from survey data - because the background was simply NOT subtracted), that I preferred to set the flag "time" off (in PREP/SPEC) as a DEFAULT In fact, in the largest majority of cases (both in survey and in pointed observations) to assume equal exposure for source and background is quite a good choice. If one knows that this is not the case (maybe because he took the background from another observation, or he modeled it), he can always set the "time" flag back on.
Soon after, commands like CREATE/ACCEPTED and COMPUTE/ACCEPTED were included in EXSAS in order to compute correctly the exposure times both for source+background and background spectra. Such procedures select the data in such a way that the portions of sky under examination are always entirely included in the PSPC field of view. This means that if the background area is larger than the source+background area, it will be exposed less. In this case, and only in this case, one is supposed to set the time flag in PREPARE/SPECTRA.
In order to have a more complete description of PSPC survey data reduction, read the paper "Procedures for the interactive analysis of point sources from the ROSAT XRT/PSPC All-Sky Survey", Astron. Astrophys., Vol. 283, p. 1037-1045 (1994), T.Belloni, G.Hasinger, C.Izzo, or get the "EXSAS Adventures in Surveyland" by Tomaso Belloni.
When I try to model the PSPC particle background with the REMOVE/PARTICLE command, I get the error "MASTER VETO GREATER THAN 170!" and the program stops. What shall I do?
The particle background model depends principally on the PSPC Master Veto rate (listed in the eventrates.tbl table). This model is defined up to a MV rate of 170 counts per second (see "An Updated Calibration of the ROSAT PSPC Particle Background for the Analysis of Diffuse and Extended Sources", P.P. Plucinski, S.L. Snowden, U. Briel, G. Hasinger, and E. Pfeffermann, 1993, Ap.J. 418:519-531). If you have selected your data including time intervals where the MV rate is too high you should select them away (don't regret it, you are just getting rid of data with high background anyway). The way to do this isMidas 002> SELECT/INT 1,170 in=events,eventrates,:ee_mv out=f_eventswhere events.tbl is your input photon list, eventrates.tbl your House Keeping table, and f_events.tbl is the output (filtered) photon list.
When I try the command SELECT/INT 1,170 in=events,eventrates,:ee_mv out=f_events I get the message "number of parameters in command line exceeds 300". What now?
Up to 150 time intervals (i.e. 300 parameters) are allowed for each time selection command. The command SELECT/INT defines implicitely a time selection based on the time dependent value of the MV rate. When the MV rate is noisy, close to the 170 counts per second level, and the observation is long, this limit can be reached - and an error message generated. The solution is to smooth your MV rate data (in general, they should always be smoothed, because the MV rate in an interval of one second is never very well defined). The smoothing is part of a useful sequence of operations performed by the command PROCESS/HK, so apply this command to your data and life will again be worth to live.
Do you have GUIs in EXSAS?
Sure, but for the moment our GUIs must be considered just experiments. In other words, we are not exporting them! They are all made with TclTk (Tcl 7.4 and Tk 4.0).
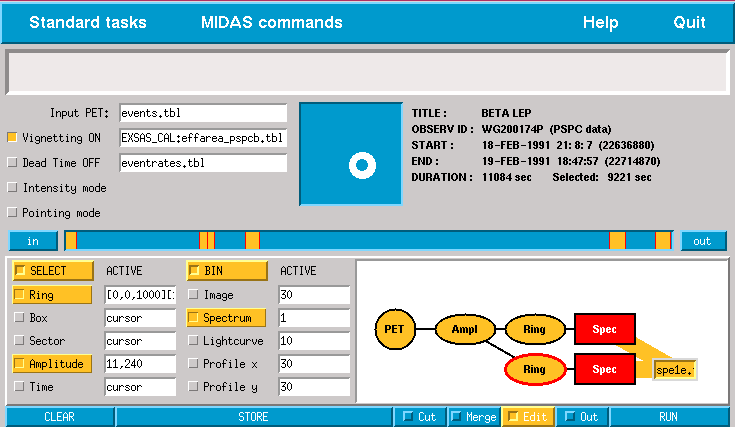
Here are my proposals: a GUI for photon selection, binning, plus some basic instrumental corrections. Looks great, right? And it is. In the picture above, the GUI is configured for selecting source+background and background photons, bin them into two spectra, correct them for the vignetting, and write them both into a table called spe1e.tbl. You can plot your spectra just by clicking on the output file name. Select and bin operations are described conventionally in the lower left panel, and in a graphic and editable form in the lower right canvas (ovals are selected sub-lists of photons, rectangles are binned datasets, small rectangles are output files).The long, narrow window in the middle displays the time span of the current observation (the Accepted Time Intervals are marked in yellow). Any time interval can be selected here via the cursor. If your time intervals are too short, you can zoom and scroll this window.
The squared window at the center is used to display spatial selections whenever the mouse is crossing any item in the canvas.
You may get some more hint about niceties just by looking at the picture.
Another proposal is the Mother of All GUIs, i.e. a GUI that is reading the documentation for you, and build itself accordingly. Cool, eh? You'll never need to RTFM again...
In order to work, this thing just needs one piece of information: the EXSAS or MIDAS (yes, also the whole MIDAS is covered) command name. The appropriate LaTex file containing the documentation on the command is found, parsed in all it's parts, and if the documentation is correct also the generated GUI will be correct. Here is what is generated for the command COMPUTE/LIFE_TIME:
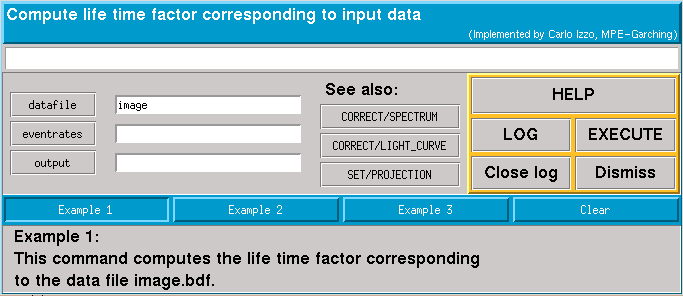
This is mainly a form to fill up. But in this form you can load examples; you can get brief help on each single parameter by clicking on the parameter name (one-line help is of course available without clicking); you can navigate to related commands (click!, click!); you can log what you are doing; you can (if you really want it) ask for more extended help; and last but not least, you can even execute your command.Do you have suggestions? They are welcome!
What is the proper reference for the data used in the command CALC/GALACTIC_NH? Is it really Dickey & Lockman (1990)? There are no data there!
This article doesn't contain the data itself, they are too voluminous. But the article describes how the NH map was compiled (and also where to get it).Send your questions about the EXSAS spatial analysis to Stefan Döbereiner.
What is the proper image binsize for source detection tasks ?
      Proper image bin sizes for source detection tasks
    -----------------------------------------------------------

     ROSAT, PSPC   1 image pixel  =  30 sky pixel  =  15 arcsec
     ROSAT, HRI    1 image pixel  =  10 sky pizel  =   5 arcsec
     ROSAT, WFC    1 image pixel  =   7 (WFC) sky pixels  = 42"
     Survey        1 image pixel  = 192 sky pixel =   96 arcsec

    -----------------------------------------------------------

     A source detection image must have 512 x 512 (image) pixels.
What is the difference between sky, image and detector pixels ?
Sky pixels:
Coordinate system, centered on the nominal pointing direction. One sky pixels equals 0.5" on the sky (PSPC and HRI) or 6" (WFC). The unit of the world coordinate system of MIDAS/EXSAS images is sky pixel (descriptors START, STEP). In tables usually referred to as :X_SKY and :Y_SKY or as :XPIX and :YPIX (events tables). Sometimes also called OMAS pixel.Image pixels:
Size depends on the binning of the image. Commonly used image pixel sizes are 1 image pixel equalling30 skypixels = 15" (PSPC) 192 skypixels = 96" (PSPC survey) 10 skypixels = 5" (HRI) 6 WFC sky pixels = 42" (WFC)The origin is in the lower left corner of the image (1,1). Beware ! There is an offset to the MIDAS frame pixels (which you get e.g. by using GET/CURSOR) which start with (0,0). Columns :X_POS, :Y_POS, :X_IMA or :Y_IMA in tables refer to image pixels.Detector pixels:
Coordinate system, fixed on the detector plane. The pixel size is:0.934 detector center at 4122,3929 (PSPC) 0.557 detector center at 2048,2048 (HRI) 9.0 detector center at 0,0 (WFC)In tables usually referred to as :XDET and :YDET. The (time-variable) transformation between detector pixel and sky pixels is determined by the satellite attitude (XOFFSET, YOFFSET, ROLL ANGLE).
What is the use of the exposure map in CREATE/BG_IMAGE ?
 - The exposure map is NOT used to correct the output back-
   ground image. The output smoothed background image has
   to be uncorrected to be useful in source detection; in
   fact, all input images involved in source detection have
   to be uncorrected.

 - The exposure map is used to give a better spline fit to
   the cheesed background image.

   The procedure goes like this:
    1. Sources are cut out from the original image, using
       the LDETECT source list lslst1.tbl.

       ---> cheesed background image
    2. The cheesed background image is divided by the
       exposure map. This smoothes out smaller-scale
       irregularities, e.g. the PSPC rib structure.

    3. The resulting corrected cheesed background image is
       fitted with a bicubic spline.

    4. The spline image is multiplied with the exposure map,
       to obtain an "uncorrected" smoothed background image.

    5. The smoothed background image is multiplied with the
       background scale factor (1.0 by default) and converted
       to Integer format.

Q: Which exposure map is best for this task ?

 - The choose of the exposure map is rather uncritical, since
   it is never used to really "correct" something. It depends
   on the user how much work he wants to put into the creation
   of the exposure map:

 * Fast & easy way: Don't use any exposure map at all. This
   can be accomplished by setting parameter EXPOSURE_FLAG in
   the parameter file to F (False). However, the result should
   be checked whether the spline gave reasonable results. For
   the HRI this approach is sufficient in every case. For the
   PSPC it is recommended to use one of the methods described
   below.

 * Easy way: Use any exposure map you have at hand. For
   example, you can use the exposure map from the ROD. Check
   the results.

 * More accurate way: Create an exposure map which is typical
   forthe mean energy/amplitude of your background. Use
   CREATE/EXPOSURE for converting an instrument map (to be
   found in the EXSAS calibration area) to an exposure map.
   The calibration area contains different PSPC instrument maps
   for different narrow or broad energy/amplitude bands. Choose
   one so that most of the background falls into the bandwidth
   of the instrument map. Since the ROSAT PSPC background is
   usually very soft, instrument maps moimp_8_19.. or
   moimp_8_41.. will probably be best. Check the results. Use
   this approach if you want to get high quality results.

 * Most accurate way: Use CREATE/EXPOSURE, as before. Use a
   combination of instrument maps matching your background
   spectrum. To do this, follow the instructions given in the
   parameter file of CREATE/EXPOSURE. Check the results. Use
   this approach if you have too much time.

   DOE/MPE 950412
Which images can be used for EXSAS source detection ?
 - The images must have the EXSAS standard header.

 - The experiment must be supported by EXSAS. Currently supported
   experiments/dectectors are ROSAT-PSPC, ROSAT-SURVEY, ROSAT-HRI,
   ROSAT-WFC, and EXOSAT L-1 (partially supported).

 - The images have to be uncorrected. That means, they should be not
   corrected for exposure, vignetting or deadtime. The command
   CREATE/SOURCE_DETECT_IMAGE produces such images.

 - The image size has to be 512 x 512 pixels.

 - The binsize should be the standard binsize supported by EXSAS.
   That means: one image pixel corresponds to
       30 sky pixel = 15 arcsec (PSPC, pointing),
      192 sky pixel = 96 arcsec (PSPC, survey),
       10 sky pixel = 5 arcsec (HRI),
        7 WFC sky pixels = 42 arcsec (WFC).
   CREATE/SOURCE_DETECT_IMAGE creates images with proper binsizes.
   The source detection will run for other binsizes. Note, however, that
   the software is optimized for the standard binsizes. A binsize too much
   different from those may result in unreliable results.


   DOE/MPE 950412
ROSAT doesn't really have more than maybe 7-10 independent energy channels (this is approximately correct, yes?), binning by S/N ratio can produce too many statistically dependent bins, and thus artificially decrease the reduced chi-squared value. Yes?
No. Here you are mistaking energy resolution with statistical dependency. The energy information of the PSPC photons is collected within 256 (not calibrated) amplitude channels (column RAW_AMPL in your photon event lists). These channels are statistically independent. In a second step, a new set of calibrated (i.e. having almost linear relation to energy) amplitude channels is defined. This is known as gain correction: what it does it to "stretch" the raw amplitude channels and to map them into an interval of 400 calibrated channels or so. Clearly, the counts in the new channels (being the result of mapping into a greater number of channels - which requires interpolation) are no longer statistically independent. For this reason one should slightly rebin his spectra before to try to fit them (as a rule of thumb, each spectral bin should include at least two of the original - calibrated - amplitude channels).
When shall I rebin a spectrum with a constant bin size?
Never. It's useless. Forget it. Use the non-constant rebinning option (command PREPARE/SPECTRA) keeping S/N ratio constant for each bin. The reason of this is that the spectral fitting procedure in EXSAS is based on a chi-squared test. Such test is meaningful only with spectral bins with good enough statistic (say, S/N > 3): a fitting on "upper-limit" data is not the best thing one can do...
With a constant bin size, the low-counts bins at the low and high energy ends of the spectrum should be excluded from the fit procedure - and no one in the world would enjoy throwing good X-ray photons in the trash bin, right?
When I rebin a spectrum with the constant-S/N constraint, every spectrum will be binned differently. How can I sum two such spectra (for instance, from the same source observed in different observations) in order to improve my signal?
The way to do this is to save the constant S/N binning
structure of the first spectrum, and to apply the same binning
to the other spectrum(s):
        Midas 001> PREPARE/SPEC spec1 out1 ? signal=5,file
        Midas 002> PREPARE/SPEC spec2 out2 ? file
Here the first spectrum is rebinned at a constant S/N=5.
The rebin structure is saved to file "file". The next command
applies the same rebinning (reading it from the file "file")
to the second spectrum (in general S/N will not be 5 for it,
of course).
How do I create a table of conversion factors to derive fluxes from source counts, given NH and spectral index of the source? I have used the curves in the ROSAT AO-2 Technical Appendix 1991. As you may guess, the precision is a little low...
Not only: the curves in the AO technical Appendix are not even based on flight data. We therefor have build a command called CONVERT/CTS2FLX which works both, on count rates given from the command line and on table input. A For a more detailed description see the spectral homepage.
Which effective area and which detector response matrix shall I use for my PSPC data?
To answer some frequently occuring questions about the usage of the different PSPC detector response matrices and effective area tables:The effective areas valid for detectors PSPC C and PSPC B differ. They can be found in the EXSAS calibration area under the filenames exsas_cal:effarea_pspcc.tbl and exsas_cal:effarea_pspcb.tbl. One should check that the correct effective area file is used for spectral analysis.
If you are not sure which detector was used for your observation, check the observation date (or spacecraft clock, descriptor :OBS_CLOCK). The switch from PSPC C to PSPC B took place on Jan 25, 1991 (Julian date 2448282.0, spacecraft clock SCC=20530000).
The detector response for detectors PSPC C and PSPC B is identical. Consequently there are no separate DRM files for the two PSPCs in the EXSAS calibration area.
The spectral response of the PSPC is changing slowly but in a non-linear matter with time. At the present status of calibration it is suggested to use one of two following DRM's:
- exsas_cal:drmpspc_ao1.bdf (identical with exsas_cal:drmpspc_06.bdf) - exsas_cal:drmpspc.bdf (identical with exsas_cal:drmpspc_36_300_1_full.bdf)
depending on the date of observation.
A convenient break point between usage of the matrices is Oct 11, 1991, (Julian date 2448541.0, spacecraft clock SCC=42910000) when a major gain change took place. For observations prior to this date (survey, calibration phase, AO-1 and the first weeks of AO-2) it is suggested to use drmpspc_ao1. For observations later than Oct 11, 1991, drmpspc.bdf is recommended. This recommendations may change in a few months when newer response matrices become available.
Please keep in mind that whatever response matrix you use, it is only an approximation to the real detector response at a given time. The differences between fits with the two matrices can be interpreted as estimates for the systematic errors.
To summarize all this:
            date             SCC         PSPC   effective area    DRM
     =========================================================================

       < Jan 25, 1991     < 20530000     C      effarea_pspcc     drmpspc_ao1

         Jan 25, 1991       20530000     B      effarea_pspcb     drmpspc_ao1
       - Oct 11, 1991     - 42910000

       > Oct 11, 1991     > 42910000     B      effarea_pspcb     drmpspc
The EXSAS commands FIT/SPECTRUM and BIN/DETECTOR_RESPONSE select by default the correct response matrices and effectiv area tables if not specified explicitly in the command line. The internal decision which DRM and which effective area table has to be used as default is based on the descriptor OBS_CLOCK(1) (i.e. start SCC) in the header of the corresponding spectral file.
What is the difference between the correlated errors and the uncorrelated errors in a spectral fit with EXSAS?
The meaning of the correlated and uncorrelated error is the following:In spectral models the fitted parameters are often correlated with each other, e.g. temperature and radius in a blackbody fit. The uncorrelated error is computed using only the diagonal elements of the covariance matrix whereas the correlated error is computed using the full matrix (all matrix elements).
Coming back to the blackbody model: here one fits the radius and the temperature. Both have an error but both parameter are correlate. The uncorrelated error is the fit error, obtained so as if T and R were uncorrelated, i.e. independent from each other, whereas the correlated error should be larger and takes into account that both parameters are correlated, i.e. the error in R is computed taking into account the error in T and vice versa.
Questions concerning the Timing Analysis Package
Of what order are the residuals of the SCC to UTC fits used in EXSAS 96JAN_EXP to convert the photon arrival times from spacecraft clock units to UTC ?
The SCC to UTC fits which go into EXSAS are done on the basis of the full set of ROSAT on-board clock calibration points available for a whole year. This points are fitted with a higher order polynom. The, residuals of the fits are in the order of 3-5 milliseconds over a year. Plots of the residuals for the years since 1990 can be found on the EXSAS Timing Homepage
Question concerning the EXSAS Installation Process
How do I get EXSAS?
Just send me a mail.
> How do I get a copy of the EXSAS User's Guide?
If you want to be sent the manual on paper (yellow cover for the User's Guide, green cover for the Commands Summary), send a mail to Lynn Falke. Otherwise get the html file here.
Where do I get a copy of the "EXSAS Adventures in Surveyland", by T. Belloni?
Here.
Where can I install EXSAS ?
Presently EXSAS 96JAN_EXP is running on DEC OSF/1 2.0, DEC ULTRIX 4.3, SUN SunOS/4.1.3, HP 9000/755/HP-UX A.09.03, IBM and Linux.ELF. I hate to admit that the VMS release, both for VMS and Open_VMS, is also available.
I have just finished with the installation, but no EXSAS command seems to work: I just get the error message "Command could not be found... The `command portion' of the command you just entered, is unknown to MIDAS". What shall I do now?
Are you sure that the EXSAS context is "on"? Type the commandMidas 001> SET/CONTEXT EXSASevery time you start a new session. A preferable alternative to that is to initiate automatically EXSAS every time you start MIDAS. If you want this to be true for ALL MIDAS users, then add the line SET/CONTEXT EXSAS at the top of the file$MIDASHOME/$MIDVERS/prim/proc/login.prg;otherwise the single user can decide to place the line SET/CONTEXT EXSAS at the top of his own login.prg (in his MIDWORK directory). Don't put the SET/CONTEXT line at the end of the login.prg files, because this would destroy all the commands defined beforehand (this happens because EXSAS needs to expand the MIDAS command buffer).
Questions concerning the Linux Version of EXSAS
What are the system requirements to install EXSAS on a PC?
EXSAS'96 for Linux has been compiled with the LINUX Kernel version 1.2.13 - ELF and is optimised for INTEL Pentium and i486 CPU's. To rum EXSAS properly your PC should have 32 MB RAM, a Graphic card which supports at least a screen resolution of 1024x768 pixels and 256 colors, a fast disk of at least 500 MB (better would be 1 GB) and a 17" (better 21") screen. The disk space required to install MIDAS (release 95NOV) and EXSAS.ELF is about 100 MB. MIDAS (95NOV) for LINUX.ELF is available from the ESO .
Where can I get EXSAS for LINUX
EXSAS for Linux is available from the ROSAT Service Area. Click here to get to the right directory.
Is EXSAS for LINUX Freeware / Shareware or do I have to pay for it ?
EXSAS is under license of the Max-Planck-Institut for extraterrestical Physics (MPE), D-85740 Garching, and not Freeware nor Shareware. Although it is distributed to all scientific institutes for free the copyright of the software is at MPE. Users who have get the software should register to get regularly updated with the EXSAS News, bug report, etc....